安卓java层混淆

对于一个应用release包来说,存在混淆效果是十分正常的。添加混淆不仅能够使用无意义的命名去重新命名类、方法及变量,使得应用代码被混淆难以反编译及进行逆向工程,同时在一定程度上还能够减小包的大小。

在Android里面,由于我们常用的IDE:Android Studio集成了ProGuard,因此我们最常用,最简单的混淆是ProGuard混淆。ProGuard混淆主要包括有四个功能:

  1. 压缩(Shrink):用于检测和删除没有使用的类、字段、方法和属性。
  2. 优化(Optimize):对于字节码进行优化,并且移除无用指令。
  3. 混淆(Obfuscate):使用a,b,c等名称对类,字段和方法进行重命名。
  4. 预检(Preverify):主要是在Java平台上对处理后的代码进行预检。

使用

Android Studio中集成了ProGuard,因此在项目中默认配置了proguard-rules.pro文件,我们可以直接修改此文件。

Android Studio使用ProGuard主要包括如下几个步骤:

  1. 配置文件中打开混淆。
  2. 配置混淆文件。
  3. 检查日志文件,apk文件以及apk运行状况,查询是否有错误出现。

一. 配置文件中打开混淆

在build.gradle文件中配置如下代码:

1
2
3
4
5
6
7
8
9
10
11
12
13
14
15
16
17
18
19
20
21
android {
buildTypes {
debug {
...
}
release {
//混淆开关
minifyEnabled true
// 是否zip对齐
zipAlignEnabled true
// 移除无用的resource文件
shrinkResources false
// 是否打开debuggable开关
debuggable false
// 是否打开jniDebuggable开关
jniDebuggable false
proguardFiles 'proguard-rules.pro'
signingConfig signingConfigs.release
}
}
}

从上述代码中可以看到配置混淆开关的是minifyEnabled,设置为true可以打开混淆。

混淆一般是配置在release包中,原因是因为debug包一般来说是开发者在开发需要时运行调试的,混淆会减慢打包速度,对于开发程序效率有所影响。但是这不表示我们在开发程序时不注重混淆设置,在混淆设置不正确的情况下可能会发生查找不到某个类的异常,因此如果项目中有打开混淆,在需求完成后添加混淆并自测是必要步骤。

在配置文件proguard-rules.pro中,这套基本都是通用的了。

1
2
3
4
5
6
7
8
9
10
11
12
13
14
15
16
17
18
19
20
21
22
23
24
25
26
27
28
29
30
31
32
33
34
35
36
37
38
39
40
41
42
43
44
45
46
47
48
49
50
51
52
53
54
55
56
57
58
59
60
61
62
63
64
65
66
67
68
69
# Add project specific ProGuard rules here.
# You can control the set of applied configuration files using the
# proguardFiles setting in build.gradle.
#
# For more details, see
# http://developer.android.com/guide/developing/tools/proguard.html

# If your project uses WebView with JS, uncomment the following
# and specify the fully qualified class name to the JavaScript interface
# class:
#-keepclassmembers class fqcn.of.javascript.interface.for.webview {
# public *;
#}

# Uncomment this to preserve the line number information for
# debugging stack traces.
#-keepattributes SourceFile,LineNumberTable

# If you keep the line number information, uncomment this to
# hide the original source file name.
#-renamesourcefileattribute SourceFile

#指定压缩级别
-optimizationpasses 5

#不跳过非公共的库的类成员
-dontskipnonpubliclibraryclassmembers

#混淆时采用的算法
-optimizations !code/simplification/arithmetic,!field/*,!class/merging/*

#把混淆类中的方法名也混淆了
-useuniqueclassmembernames

#指定不去忽略非公共的库的类
-dontskipnonpubliclibraryclasses

#不做预检验,preverify是proguard的四大步骤之一,可以加快混淆速度
#-dontpreverify

# 忽略警告(?)
#-ignorewarnings

#混淆时不使用大小写混合,混淆后的类名为小写(大小写混淆容易导致class文件相互覆盖)
-dontusemixedcaseclassnames

#优化时允许访问并修改有修饰符的类和类的成员
-allowaccessmodification

#将文件来源重命名为“SourceFile”字符串
#-renamesourcefileattribute SourceFile
#保留行号
-keepattributes SourceFile,LineNumberTable
#保持泛型
-keepattributes Signature
# 保持注解
-keepattributes *Annotation*,InnerClasses

# 保持测试相关的代码
-dontnote junit.framework.**
-dontnote junit.runner.**
-dontwarn android.test.**
-dontwarn android.support.test.**
-dontwarn org.junit.**

# 混淆字典
-obfuscationdictionary dic.txt
-classobfuscationdictionary dic.txt
-packageobfuscationdictionary dic.txt

—————-以上摘自:https://www.jianshu.com/p/e01f547979bb ———————

配置目录截图:

upload successful

其中dic.txt的生成脚本

1
2
3
4
5
6
7
8
9
10
11
12
13
14
15
16
17
18
19
20
21
22
23
24
25
26
#!/usr/bin/env python
# encoding: utf-8
# 混淆字典生成
import random
length = 10
result = set()

keys = ["U","v","V","u"]
#也可以使用 I,i,L,l,1这种。
#因开发者而异,怎么恶心怎么来

for o in range(1,100000):
# 长度 7- 13 位
for length in range(6,13):
# 按照长度随机拼接
temp = keys[random.randint(0,1)]
for i in range(1, length+1):
temp += random.choice(keys)
result.add(temp)


print("成功生成字典,数量:", len(result))

with open("dic.txt",mode='w+',encoding='utf-8') as f:
f.writelines("\n".join(result))
f.flush()

混淆之前,反编译出来的代码基本和源码一样。很容易被窥探代码逻辑。
upload successful

混淆成功之后,混乱不堪。
upload successful

但是字符串还是没混淆,通过一些特征还是可以分析的。
之前用过stringfog这个工具,后来由于没怎么更新,不兼容新的gradle版本,因此也没时间二次开发。

有能力的可进行stringfog的二次开发,原理都一样,据所知某些加固产品,也是基于这些方法实现。

StringFOG: https://github.com/MegatronKing/StringFog

https://github.com/MichaelRocks/paranoidparanoid代替。
优点:兼容性高,灵活配置
缺点:不能全局加密,只能选择某个class下的字符串加密

具体配置如下:

1
2
3
4
5
6
7
8
9
10
11
12
13
14
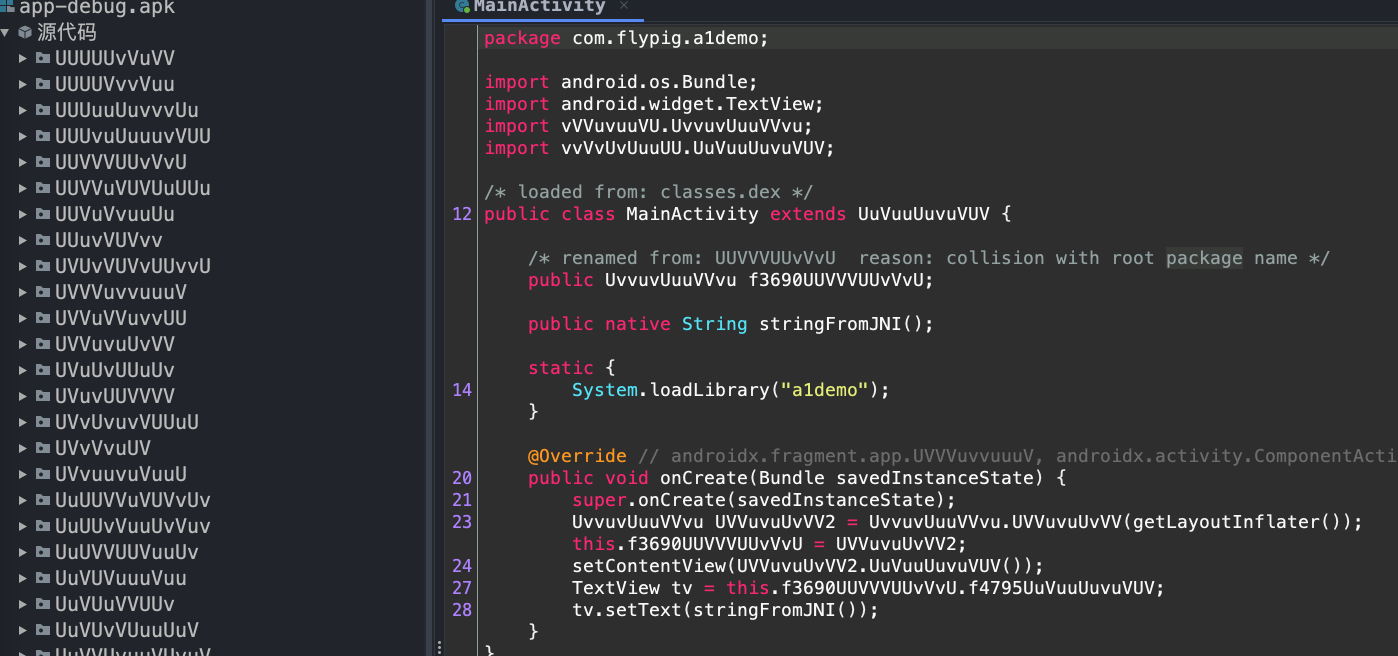
In order to make Paranoid work with your project you have to apply the Paranoid Gradle plugin to the project. Please notice that the Paranoid plugin must be applied after the Android plugin.

buildscript {
repositories {
mavenCentral()
}

dependencies {
classpath 'io.michaelrocks:paranoid-gradle-plugin:0.3.7'
}
}

apply plugin: 'com.android.application'
apply plugin: 'io.michaelrocks.paranoid'

加密完就是这样子

1
2
3
4
5
6
7
8
9
10
public class UvvuvUuuVVvu {

/* renamed from: UvvuvUuuVVvu reason: collision with root package name */
public static String f4695UvvuvUuuVVvu = UVUvvvUUvU.UvvuvUuuVVvu.UvvuvUuuVVvu(-2238559751030696372L);

static {
UVUvvvUUvU.UvvuvUuuVVvu.UvvuvUuuVVvu(-2238559712375990708L);
UVUvvvUUvU.UvvuvUuuVVvu.UvvuvUuuVVvu(-2238559699491088820L);
}
}

说实话,我已经不想分析了,虽然用jeb也能自动还原。但面对庞大的apk的时候,jeb的性能就不是这么高了。